Step 2: Setting up your MIDI system
MIDI stands for Musical Instrument Digital Interface. It’s the language spoken by computers and electronic musical instruments. We’ll assume that you’re connecting a MIDI keyboard, although you can use any MIDI instrument. In this guide, “MIDI keyboard” refers to whatever type of MIDI device you are using.
At the very least, you’ll need the following equipment for an operational MIDI system (not including your computer):
- A MIDI keyboard
- Amplifier/speaker or headphones
- Two MIDI cables
- A MIDI interface with appropriate USB cable
The last item, a MIDI interface, is a device that translates the signals arriving from the MIDI keyboard into signals that the computer understands, and vice versa. The most basic interfaces require no external power and have ports (jacks) for a single MIDI keyboard; more expensive models have ports for multiple MIDI devices or other features. Most Macs have USB (Universal Serial Bus) ports, a standard that allows users to connect devices to their computers without needing to restart for the devices to become active.
- Place the computer, keyboard, and MIDI interface where you want them. Go ahead and plug in any power cords, but don’t turn anything on yet.
- Plug one end of the MIDI interface cable into the interface (if applicable). Plug the other end into the USB or serial port on the back of your Mac.
- Plug one end of a MIDI cable into the MIDI keyboard port marked MIDI In. Plug the other end into the MIDI interface port marked MIDI Out. Plug the second MIDI cable into the interface port marked MIDI In and the MIDI keyboard port marked MIDI Out. The most common problem encountered by a new MIDI user is improperly connected cables. The trick is to think of the route the music data is taking. The notes you play will leave your MIDI keyboard from the port marked Out, and enter the interface through the port marked In, then on to the computer. Similarly, when the computer plays back your music, the notes go out from the computer to the interface, leave the interface through the port marked Out, and enter your MIDI keyboard through the port marked In. So, although it may seem contrary to common sense, plug the In to the Out and vice versa.
- Turn on all your equipment.
Your MIDI system is now configured. To configure additional settings, see Configuring MIDI in OS X below. When you are ready to continue, move to the next step, Launching and authorizing Finale.
You can use a helper utility already available on your computer to configure your MIDI devices by following these steps.
- Navigate to your hard drive, and choose Application > Utilities > Audio MIDI Setup. Your Mac's Audio MIDI Setup dialog box is displayed. Now, we’ll add new devices.
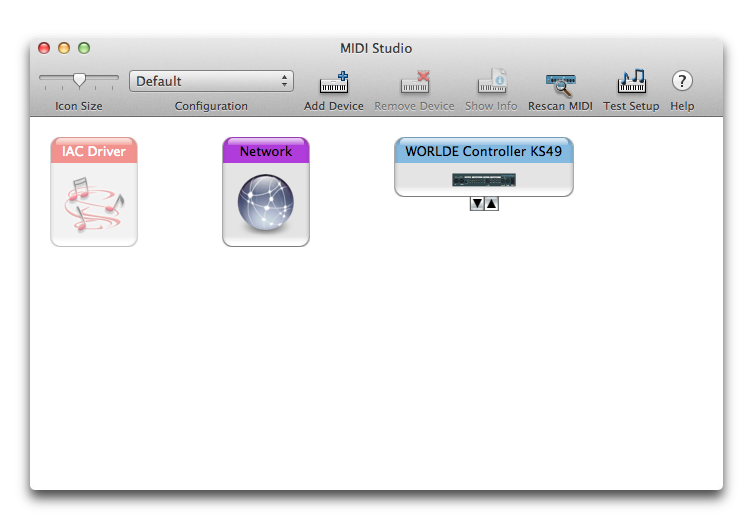
- Click the MIDI Devices tab (or choose Window > Show MIDI Window. Audio MIDI Setup will search for MIDI hardware and software. After the search, your MIDI interface will appear. If your computer does not recognize the device, consult the documentation that accompanied the device for installation instructions.

- If you are using a controller for MIDI input, drag the outgoing arrow of the MIDI controller to the incoming arrow on the MIDI interface.
- If you are using a sound module for playback, drag the incoming arrow of the sound module to the outgoing arrow on the MIDI interface.
- If you are using a device such as a MIDI keyboard for both input and playback, connect the outgoing arrow on the MIDI device to the incoming arrow on the MIDI interface, and then connect the incoming arrow of the MIDI device to the outgoing arrow of the MIDI interface. Now, to ensure your devices are installed properly on your computer, we’ll test the MIDI setup.
- Click the Test Setup button on the upper right. The cursor changes into two eighth notes.
- Click the DOWN ARROW beneath a device’s icon
 . Your computer sends a message to your MIDI device. You see the “Out” light illuminate on your MIDI interface and/or a sound played on the MIDI device.
 - Click the Internal Speaker icon in the upper right corner of the screen and drag the slider near the top to ensure the volume is up (as shown here).

- Play a note on the external MIDI device. The external MIDI device sends a message to your computer. You see the “In” light on your MIDI interface illuminates and/or hear a beep from your computer’s internal speaker.
- Quit Audio MIDI Setup.
ヒント: To playback using General MIDI or a non-General MIDI instrument on your external MIDI keyboard or sound module, see Assigning instruments to MIDI sounds.
 Step 1: Installation Step 1: Installation
|
Step 3: Launching and authorizing Finale
|

