
Working with Linked Parts.
When you create a score with the Setup Wizard, Finale begins the task of creating individual parts for each instrument.
By the end of this lesson you will know how to:
- Generate and create parts
- Format each part while preserving the score
To begin at this point, open
Generating parts
Parts are integrated within the score and the content is intelligently linked. Edits to music in the score also apply to the part. Changes to notation in either score or part applies to the other respectively, but many elements in parts, such as expressions, text, and formatting can be edited independently. Finale introduced parts for this file automatically when we ran the Setup Wizard, which are perfectly adequate, but we will replace those with new parts to demonstrate some of the options available to you.
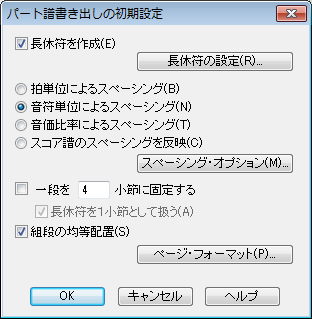
Part Creation Preferences – What it does:
Many of the changes you’ve applied to your score can also be applied to all parts at one time. In this window, you can tell Finale to generate multimeasure rests, apply music spacing and fit a certain number of measures per line.
To generate parts
- Choose Document > Manage Parts. The Manage Parts dialog box appears.
- Click Part Creation Preferences.
- Make sure Create Multimeasure Rests is selected.
- Choose Apply Note Spacing.
- Check Fit 4 Measures Per System.
- Click OK.
- Click Generate Parts. A window appears telling you that you are about to replace the existing parts. Because we have changed formatting settings on the parts, we want to replace the parts with new ones that carry these settings.
- Click Yes.
- Click OK.
- Choose Document > Edit Part > Clarinet in Bb.
Editing parts
At this point, you can format the part for printing. Even though the part has been locked with 4 measures per system, the score will stay locked with 3 measures per system. In addition, adjustments to the positioning of any item in the part will not affect its positioning in the score.
To edit parts
- Click on the Selection tool
 .
. - Click the last measure and press the up arrow to move it to the previous system. Our "C" rehearsal mark is a bit close to the
 marking in the top system. Let's move that rehearsal mark down a bit.
 - Click the "C" rehearsal mark above measure 13 and press DOWN ARROW to nudge it down a bit. Click elsewhere in the score. Notice the marking has changed color to orange
 . This means the marking's placement is now different in this part than in the score - the "C" rehearsal mark in the score did not change when you made this spacing adjustment in the part. In general, markings and text moved (or hidden) in parts apply to the part only and not the score. Next, notice we forgot to add the whole note in the last measure, so let's do that now.
 - Choose the Simple Entry tool
 (or double-click a note to activate the Simple Entry tool
 - Add a whole note B below the staff in the last measure. Notes added in parts are also added in the score. They are linked. In general, changes to notes are always reflected in both the score and parts when editing either.
When you enter into transposing staves you hear the transposed pitch, and not the concert pitch. To hear notes you enter in concert pitch, choose Document > Display in Concert Pitch.
Try editing other markings on the part; articulations, expressions, or Smart Shapes. The Selection tool can move any marking, and is therefore the quickest way to make these detailed adjustments.
For a complete list of linking behavior between the score and parts, see Linked Parts.
Creating custom parts
Sometimes, you may find you need to group specific instruments together for printing. Finale automatically groups some instruments together (such as the piano in this example). But what if you want to print a part that has just the piano and the vocal lines? You can easily create grouped parts and rehearsal scores. In this lesson we'll create a new part that includes the Voice and Piano staves.
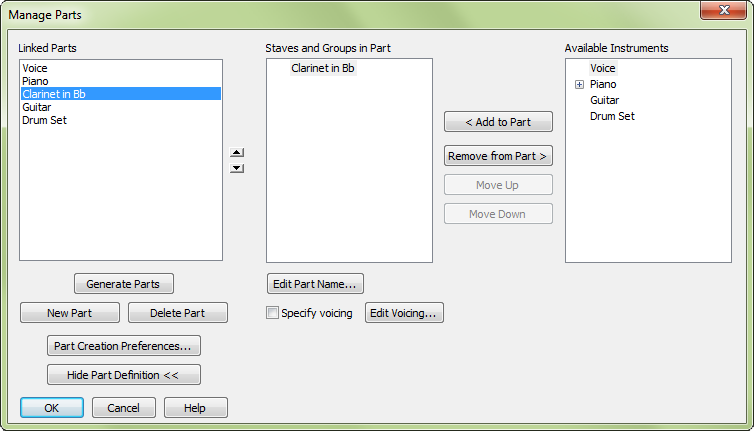
Manage Parts – What it does:
This window gives you control over your parts, their names, and what staves are contained within each. The column on the far left shows you all the parts as they currently exist in this file. Select one of the parts to display, in the center column, which staves are contained in this part, and, in the far right column, which staves or groups are not.
To create a new custom part
- Choose Document > Manage Parts.
- Click Edit Part Definition to expand the window.
- Click New Part.
- Click Edit Part Name.
- Name this part "Piano and Voice."
- Click OK.
- Under Available Instruments, choose Voice.
- Click Add to Part.
- Under Available Instruments, choose Piano.
- Click Add to Part.
- Click OK.
- Choose Document > Edit Part > Piano and Voice.
Now you can edit and format any of these parts using the skills you’ve learned.
 Previous Previous
|
Next 
|
Finaleユーザーマニュアル Home
Finale for